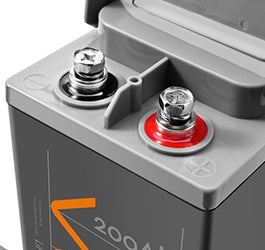
Battery terminals are just as important as the rest of your battery parts. It doesn't matter whether you're using a lithium battery or an AGM battery these should definitely be included in whatever regular maintenance you're currently practising to keep your power pack functioning at its best.
VoltX 12V 100Ah Blade Lithium LiFePO4 Battery
These terminals serve as electrical contacts whenever you connect a load or charger to your battery. They come in various designs, sizes, and features depending on your battery type. Although relatively small, they play a massive part in the overall performance of your battery, which is why they should be inspected for any battery issue culprits springing from them, especially corrosion.
What is Battery Corrosion and What Causes It?
Battery terminal corrosion is easy to identify. It's either a white, green, or bluish substance surrounding your battery pack and is a poor conductor of electricity. This increases resistance within the circuit, which leads to failure in powering your load. It's usually caused by the release of hydrogen gas from the sulfuric aside inside the battery.
These gasses will then react to the ambient atmosphere and produce a corrosive environment that can worsen through exposure to other elements like moisture or salts. Corrosion can also be the result of overcharging or undercharging.
Step-By-Step Process of Cleaning Battery Terminals
Step 1: Remove the battery cables for inspection
Disconnect your battery cables starting from the negative ones. If you're a newbie, these are pretty easy to determine since the negative cables have a - symbol on them and are typically black in colour. The positive ones, meanwhile, are marked with a + and are coloured red.
After you have removed both, inspect them for any signs of wear and tear or corrosion. See to it that the cables are not frayed and that there is no indication of peeling insulation as these limit current flow in your battery.
Step 2: Choose your cleaner and start scrubbing
You can either use a battery cleaning agent or a homemade cleaner to eliminate battery corrosion on your terminals. However, it's always best to go with the first option, especially if it's a commercial-grade one. While the usual baking soda cleaner does the job, it often fails to neutralize toxic battery acids.
If you really have no battery agent readily available and have to make use of home ingredients, simply one tablespoon of baking soda with one cup of water, stir, dip an old toothbrush in it, and start scrubbing your battery terminals.
Step 3: Rinse, dry, and polish!
Give your battery terminals a good rinse using a spray bottle or damp rag. Wipe with a dry cloth preferably a microfiber one, then remove the remaining residue with a battery terminal brush.
Step 4: Add extra protection
Attach battery terminal protectors or anti-corrosion pads on each battery post. Ideally, these should be saturated in a battery corrosion-preventative compound too. You can also put a little bit of petroleum jelly on them for lubrication and prevention of further corrosion.
Step 5: Reconnect your battery cables
All good to reattach your battery cables! After putting both positive and negative cables back, you also have the option to use a battery corrosion preventative spray as a finishing touch for extra care.
Simple, right? Regular cleaning and inspection of your battery terminal don't really require much and are usually quick to do, but they can help extend your power pack's lifespan for years. It's a must-do for every battery owner regardless of the type or capacity of battery they have be it a standard 100Ah lithium battery, a slimline battery, or a deep cycle marine battery.

VoltX 12V 200Ah Slim Lithium LiFePO4 Battery
Speaking of batteries, check out our wide collection of LiFePO4 batteries at Outbax. They're perfect if you need an upgrade and we also have the best prices and a bunch of deals for adventurers on a budget! Our solar panel and battery bundles are available for as low as $699, plus, you get to save up to 50% when you buy two lithium batteries!
See more high-power camping gear and visit our website today!


